

How To Install Dryer Vent Through Window
Dryer Vents: How to Hook Up and Install Dryer Vents
How to install a rigid metallic duct for a safer dryer.
![]() Time
Time
A full day
![]() Complication
Complication
Intermediate
![]() Cost
Cost
$51–100
Introduction
To speed up clothes drying and prevent lint build-upwards, install a smoothen metal dryer vent. These step-by-pace directions walk y'all through the tough parts. Rigid metal vents are safer than flexible plastic and metal types, which catch more lint, crave more than cleaning and tin retard airflow. Even worse, flexible ducts are easily crushed, which blocks airflow and causes the dryer to overheat, which in plow can lead to lint fires. In this story, we'll show you how to cut and install four-inch rigid metallic duct, including the toughest part—drilling the exit hole through an exterior wall.
Tools Required
Materials Required
- 4-in. duct
- four-in. elbows
- Duct cap
- Outside caulk
- Foil tape
- Pipe straps
- Vent cap
Video: How to Install and Upgrade Your Dryer Vent
Project stride-by-step (14)
Stride 1
Cull the Shortest Route for the Vent
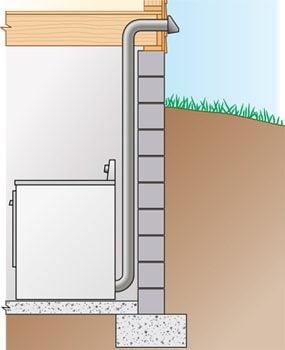
one. From an Underground Basement
- If your dryer is in the basement and the basement is underground, run duct up the exterior wall and out the rim joist.
- Set the vent a minimum of 12 inches above the outside footing.
- Pro tip: Use no more than than 25 anxiety. of 4-inch duct, and subtract 5 anxiety for every 90-degree plow and two 1/2 anxiety for every 45-degree turn for dryer vent installation. For example, a dryer with a ninety-degree elbow at the exhaust port and some other at the top of the basement wall can run a maximum of 15 feet.
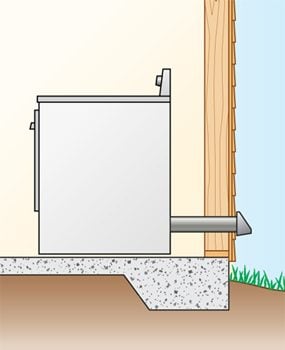
2. Straight Path From the Basement
- If the dryer is against an exterior wall that is not cloak-and-dagger, run the duct straight out from the back of the dryer.
- Set up the vent a minimum of 12 inches above the exterior basis.
- Note: This is the simplest, most ideal solution. The shorter the distance and fewer the turns the amend for dryer vent installation.
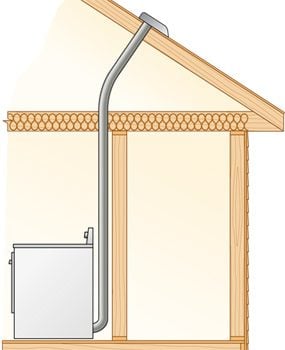
iii. Through the Attic to the Roof
- If the dryer is an interior room of the house, vent through the attic to the roof.
- Note: Vent a dryer through the roof just every bit a last resort. Cleaning lint buildup from roof vents is difficult, and nesting birds and squirrels oftentimes notice roof vent caps irresistible.
Step ii
Become Shopping
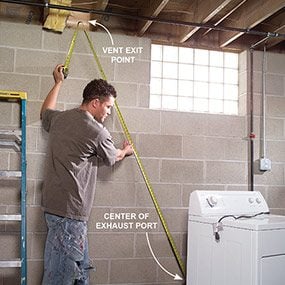
- One time you've decided on a vent location and planned the dryer duct road, measure the length of the run, allowing for bends.
- Purchase plenty straight duct and fittings to complete the job, including an outdoor cap.
- Pro tip: Employ either galvanized steel (our choice) or aluminum duct, but don't mix parts.
![]()
Step 3
Drill a Examination Pigsty in the Rim Joist
- Marking the center of the rim joist and drill a test hole with a 1/four-inch bit.
- Locate the hole outside and check for obstructions.
- Pro tip: If the hole is a little low or the cap doesn't sit in the best position on the siding, information technology's not too belatedly to adjust it. If it's really incorrect, you lot can easily fill the hole and start over at a different location.

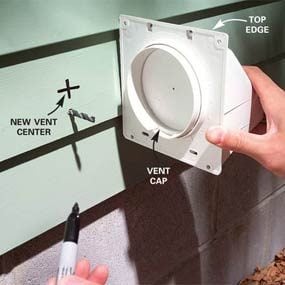
Step 4
Suit the Hole to Fit the Siding
- Shift the hole so the top of the vent cap rests on the high point of the lap siding.
- Pull the vent cap and duct apart to make measuring easier.
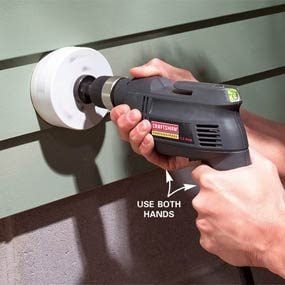
Pace 5
Drill the Vent Hole in the Siding
- Bore a 4-i/4 inch hole with a hole saw.
- Pro tip: Hold the drill level and steady. Pull the drill dorsum frequently to clear the sawdust and let the drill motor cool.
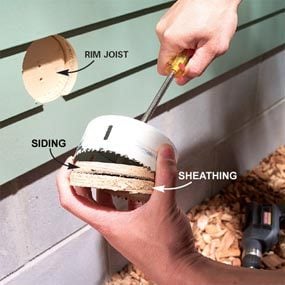
Stride 6
Drill Through the Rim Joist
- Stop and pry out siding and sheathing from the saw as you go.
- Continue your cut through the rim joist.
Step vii
Install the Vent Cap
- Insert the vent and screw the cap to the house (predrill screw holes).
- Button foam backer rod into deep gaps.
- Caulk all around with acrylic caulk.

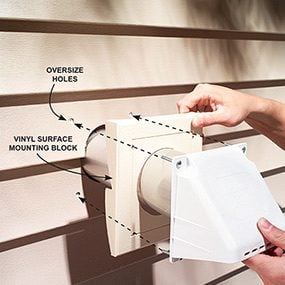
How to Mount a Vent Cap on Vinyl Siding
There are two adept ways to install dryer vents through vinyl siding. The get-go is to install a vinyl surface mounting block (shown here) that fits over the existing siding. You may need to scribe and trim the edges to precisely fit your siding contour. Fasten the surface mounting block to the business firm with screws, merely retrieve to drill slightly oversize holes through the vinyl to allow for siding movement.
The second method is to remove a section of siding and install a special vinyl mounting block (not shown) confronting the sheathing. Cutting the siding to fit around information technology. Both are bachelor from vinyl siding dealers.
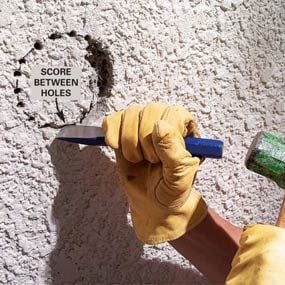
How to Make the Vent Hole in Stucco and Brick Veneer
Getting through stucco and brick requires different techniques and tools than for woods and vinyl. You'll need a masonry chip with a hammer drill for your airplane pilot hole. Then trace a 4-ane/2 in. circumvolve and drill a series of closely-spaced holes around the circumference with the i/4-in. masonry bit and hammer drill. Break out the masonry with a cold chisel. Snip the wire mesh dorsum if you're chipping out stucco. Then drill through the forest capsule and framing with a 4-ane/4 in. pigsty saw.
Step 8
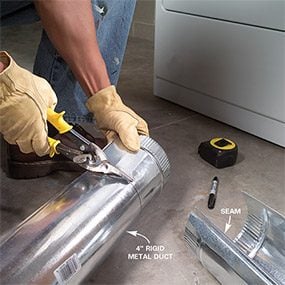
Cut the Vent to Length
- Cut the straight sections to length with tin snips earlier yous snap the seams together.
- Pro tip: Wear leather gloves—the cut metal edges are sharp.
Step 9
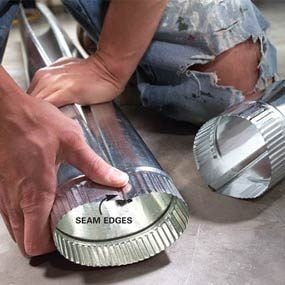
Shut the Seam on the Vent
- Marshal the seam edges of the duct.
- Working from 1 end, push the edges down slightly as you force them together.
Step 10
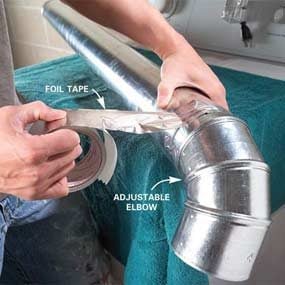
Tape the Elbow Joints
- Start at the dryer and insert the crimped terminate of the commencement elbow into the get-go straight section.
- Record the joints with metal foil tape.
Step 11
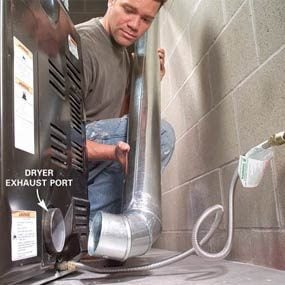
Attach the Starting time Vent Department
- Slide the showtime fitting onto the dryer and push the dryer confronting the wall.
- Mensurate, cut and assemble the other duct sections.
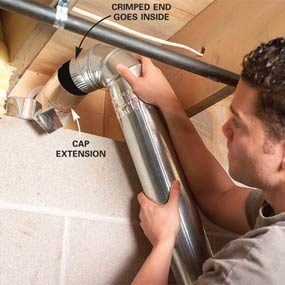
Step 12
Install the Remaining Vent Sections
- Slide the final elbow onto the straight department coming upward the wall.
- Button the crimped end of the elbow into the duct cap section and tape information technology.
Step 13
Secure the Vent to the Wall with Straps
- Anchor the duct to walls or ceilings every 6 to 8 anxiety with a pipe strap.
- Pro tip: Loop the strap around the duct; don't screw the strap to it.

Step 14
Turn on the Dryer
- Plug the dryer in and plow information technology on.
- Cheque outside to make sure the vent flap is opening.
A Note on Cleaning
Lint buildup reduces dryer efficiency, which ways clothes accept longer to dry. Check the vent cap frequently and brush out lint. At least once a year, ophidian a vacuum hose into the dryer duct to clean information technology. Tapping on the dryer duct while y'all do this will assistance knock off lint that'southward stuck to the sides and joints. To avoid fires, vacuum lint from around dryer drums, burners and motors at the bottom of the cabinet.
Originally Published: Oct 08, 2020
Source: https://www.familyhandyman.com/project/how-to-install-a-dryer-vent/
Posted by: turnercourry.blogspot.com
0 Response to "How To Install Dryer Vent Through Window"
Post a Comment